








Get to know ViCo
Hey Team, meet ViCo, your go-to digital tool designed to make your lives at the hotel a whole lot easier. Our platform has three essential pieces:
-
Back Office: Think of this as the Command Center. It’s where all the knobs and dials are and where you’ll have full control over all functionalities and features that ViCo offers.
-
Employee App: It keeps everyone up-to-date with what’s happening at the hotel. You’ll get tasks assigned here, or even auto-assign yourself if it’s something you’re responsible for. Plus, you’ll find manuals and checklists to make sure you’ve got all the info you need to do your job well.
-
Guest Progressive Web App: This is the cool part your guests will see. From the time they book a room to when they check out—and even after—they’ll use this app to interact with us effortlessly. Don’t worry, we’ll dive into the features and details later!
Introduction
But before we start diving in all its features and parts lets try to explain how ViCo works and how will it help you achieve your goals!
ViCo aims to blend intuitive design with the personal touch of in-person hospitality. Our platform is crafted to offer your guests the luxury of choice—whether they seek the warmth of traditional interactions or the efficiency and speed of digital services.
Our goal is to provide and easy to implement solution so you can offer your guest a new way to interact with you, a way that they are already use in other industries and they are demanding right now.
Moreover, this technology will enable you to streamline upsells and crosssells, improving your bottom line, and also get a real time thermometer of your in house guests satisfaction with our real-time feedback tool.
Finally, with our task management and request handling tools you will not only improve your daily operations but also gather information regarding your efficiency, if you are achieven your service standards and more!
Ok! But how do you achieve this?
First, we designed ViCo so you are able to customize it and change it in real time and with just a few clicks. Your guest will see the changes you make inmediatly! It’s not just about tweaking a description or sentence; you can also swiftly modify or hide menu items as needed, or personalize message templates for immediate dispatch. Dive into the settings section to become acquainted with all the customizable features.
Secondly, ViCo’s architecture is built around an organized flow with distinct statuses, ensuring that both you and your guests are always informed about the progress of their requests. This clarity enables efficient task assignment and coordination.
We’ve embedded our philosophy into ViCo’s design—to make it so intuitive that it feels like second nature to operate. Once you grasp the underlying principles, navigating the system will become effortless.”
Back Office
As you already know, you´ll be able control every feature of ViCo and manage every interaction with your guests! Let’s get you familiarized with its various modules:
Dashboard
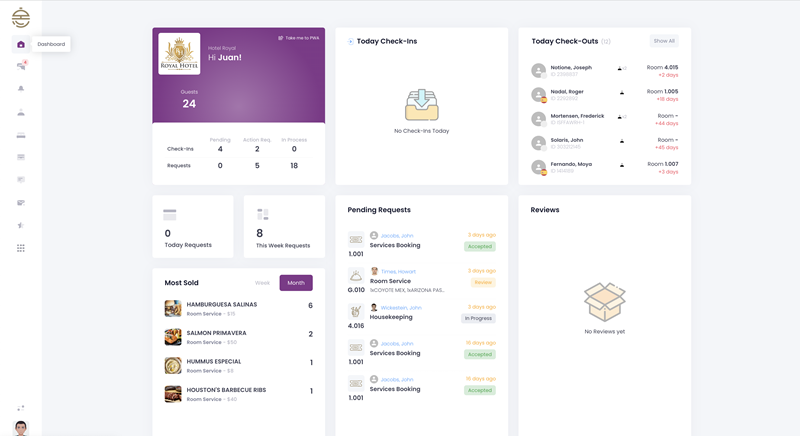
The dashboard offers a great way to see the most important information at glance. It highlights the most important information from across all modules and provides rapid access to each. Simply click on what interests you, and you’ll be directed to the corresponding module to take action.
Check in module
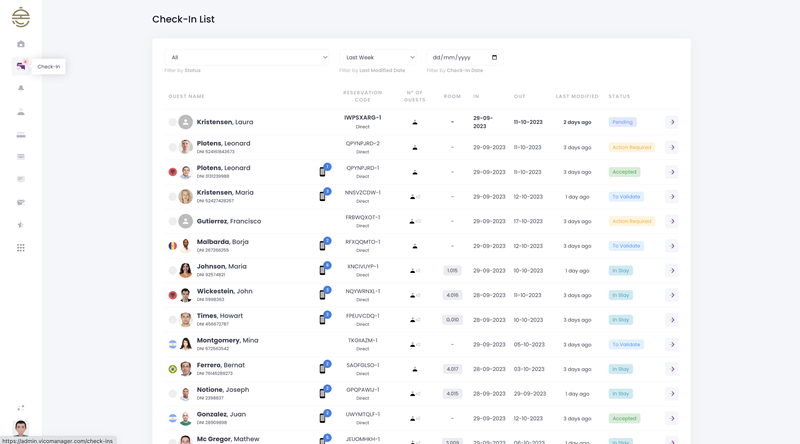
Nearly every in-house guest starts their journey with a reservation. In this module, you can manage all reservations from the instant they’re made until guests arrive at your hotel. The goal is to gather all mandatory information ahead of time, making the check-in process quick and seamless. Plus, this gives you a straightforward and efficient way to communicate with your valued guests and offer up-sells and cross-sells even before they arrive!
At the top of your screen, you’ll find a filter section. This lets you sort your guests based on different criteria. It’s a handy way to quickly find what you’re looking for.

Guest List
Just below the filter toolbar, you’ll find the guest list, full of essential details at a glance. This design lets you quickly access frequent information without the need to dive into each guest’s individual check-in page.
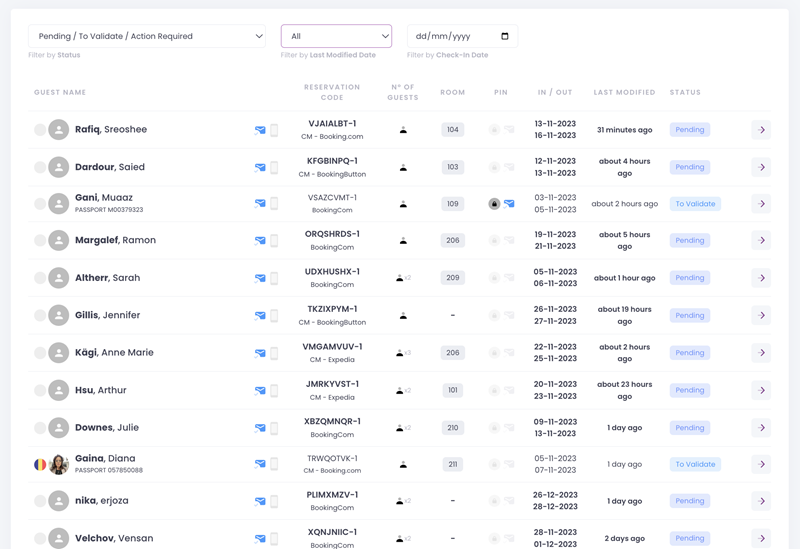
Lets see what this all mean:
In the “Welcome Email” column, an envelope icon indicates the status of the welcome email. It tells you if the email was sent successfully and the number of attempts made. For guests whose check-in dates are further out and who haven’t completed the pre-check-in, we’ll send out the welcome email periodically. This ensures guests are reminded until they complete pre-check-in or until their arrival date.
Important! If the envelope is red this means we don´t have a valid email to send the invitation. You can always add/correct it in the reservation details in your PMS and we will take it from there!
Adjacent to the envelope icon, you’ll notice a smartphone symbol. Its color serves as a quick visual indicator of guest engagement with your Progressive Web App (PWA). If the icon is greyed out, it signifies that the guest has not yet opened your PWA. Conversely, a colored icon indicates that the guest has engaged with the PWA, and we have successfully obtained their token to send them notifications.
Next you´ll see essential reservation details including the reservation code, its source, the number of guests, and the assigned room number, if assigned.
For properties utilizing PIN codes, a dedicated “PIN” column is displayed. A greyed-out icon indicates that the PIN is yet to be created, while a colored icon confirms a successful creation. You can also see if it was sent to your guest. The color coding for the envelope icon, indicating email status, follows the same conventions as discussed earlier.
Next, you’ll find the check-in and check-out dates, the timestamp of the last modification to the reservation, the current status, and an arrow icon link that directs you to the “Check-in Info” screen.
Before moving forward, you might have noticed every guest has a status linked to them. This indicates what step of the pre check in process they are in.
STATUS: What are they?
-
Pending: Awaiting guest initiation of the digital pre-check-in process.

-
To Validate: The guest has completed the digital pre-check-in process and is awaiting approval.

-
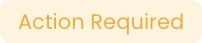
Action Required: Post-validation, additional review or information input is needed from the guest.
-
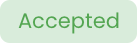
Accepted: All essential information is in place, and the reservation is set for the guest’s arrival.
-
In Stay: The guest has been checked in and its enjoying their stay!

-
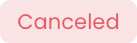
Canceled: Reservation has been nullified.
-
No-Show: Guest failed to appear on the scheduled reservation date.
Check-in Info screen
This screen serves as the hub for all important details regarding your reservations. As soon as a new reservation lands in your Property Management System (PMS), we promptly pull the details, send a welcoming email to your guest including a link to your Progressive Web App (PWA), and display the reservation here.
We will import all the data you have about the guest but its normally not much so it looks pretty empty. But dont worry! This is precisely why you do the pre-checkin right? As soon as your guest completes this process you will see all the information here, plus any direct interaction you had with him/her.
Now let´s explore it!
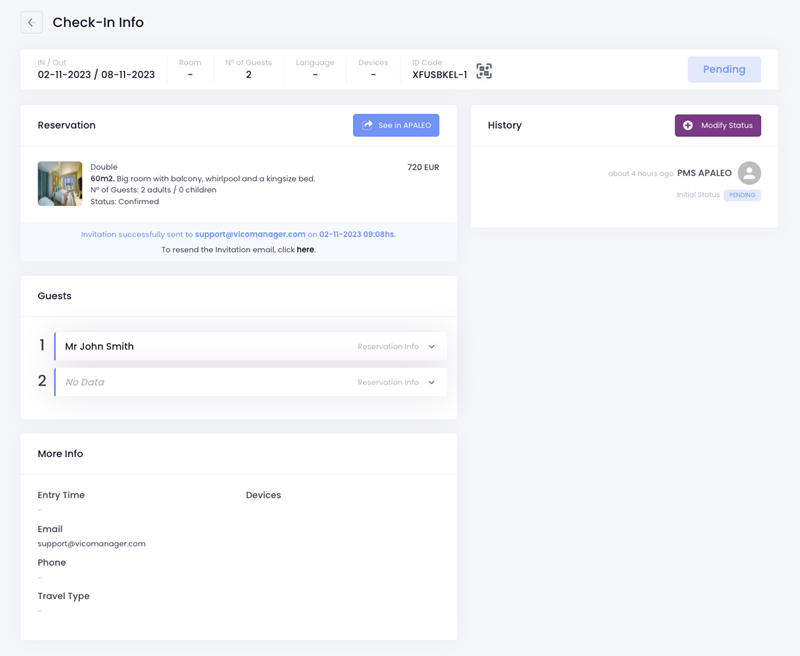
At the very top, you’ll see essential reservation details such as check-in and check-out dates, room number, number of guests, preferred language, connected devices, the PMS reservation code, and its current status. In this case, “Pending”, which indicates that the guest has not yet initiated the pre-check-in process.
Right below you´ll see other information details, like the type of room they booked, the grand total and information about the welcome email (when was it send and to what address). You can also resend it from here if needed. There is also a handy button that will take you directly to this reservation in your PMS.
In case you have PIN Codes, you will be able to see them in this section also.
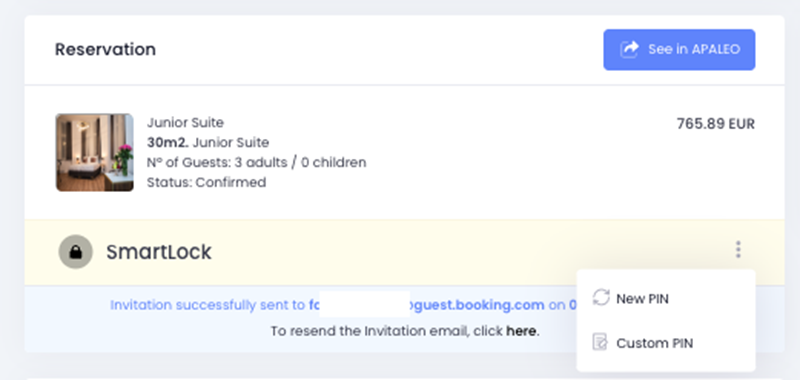
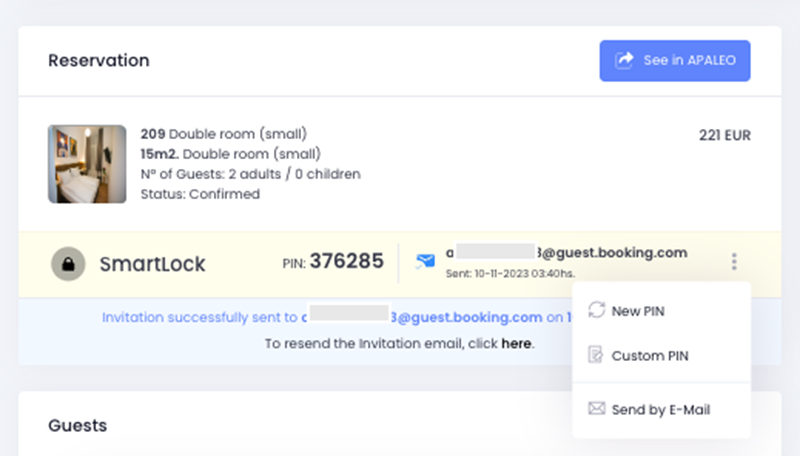
Here are the two variations of this module depending if the PIN code has been created or not. As you can see, once the PIN is created you can also re-send it from here.
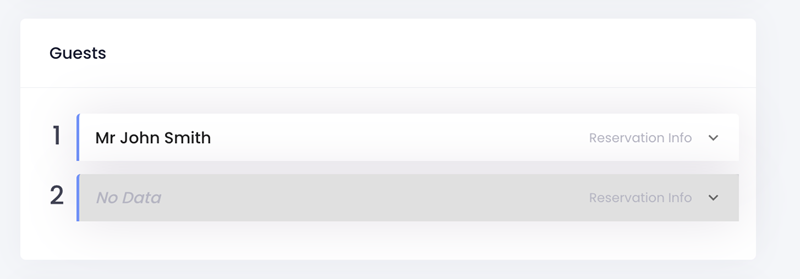
Just below you´ll find the Guest section. In this case, we still don´t have any info so the module is almost empty.
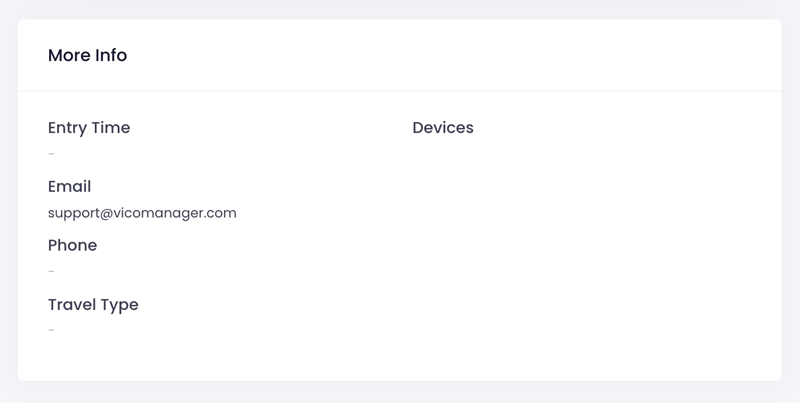
Same case with the “More info” Section just below.
On the right, the History panel tracks the progression of the check-in process, logging all interactions and providing real-time updates to your guests. It’s a complete snapshot, designed to give you full visibility and control over your pre check-in process.
Updating a check-in status is a super easy — simply click on the ‘Status’ button and choose the new status. To reply to your guests, leverage our dynamic template messages for a quick and convenient response. They’re fully editable, so you can tailor each message for that personal touch. Find out how to customize these templates in the ‘Settings’ section of this manual.
OK! Now let´s watch a video to see whats going on with our Beloved guest! Take y our time, pause it and rewind it as many times as necessary!
Video: Guest Journey Pre check in process
Now that you have an idea of how your guests experience your check in process, lets take some actions!
Video: Guest Journey Pre check Actions
Finally!!! This Check-in has been accepted! Unless your guest decides to contact you asking for any question you are done until the arrival date!
You can always change the status to “Action required” if you missed something and want. your guest to provide additional information.
Requests
Welcome to the Requests List — your central hub for guest interactions post-check-in. Here, guests can easily request in-stay services, book amenities, or signal any issues. On your end, every request is laid out for effortless management
Customize your view using the top filter row to zero in on the requests you’re looking for, whether by type, status, or date.
Key information is upfront, ensuring you’re immediately informed. Need more details or ready to manage a request? Click on the ‘Manage requests’ icon (the arrow) to dive deeper.
Request Info
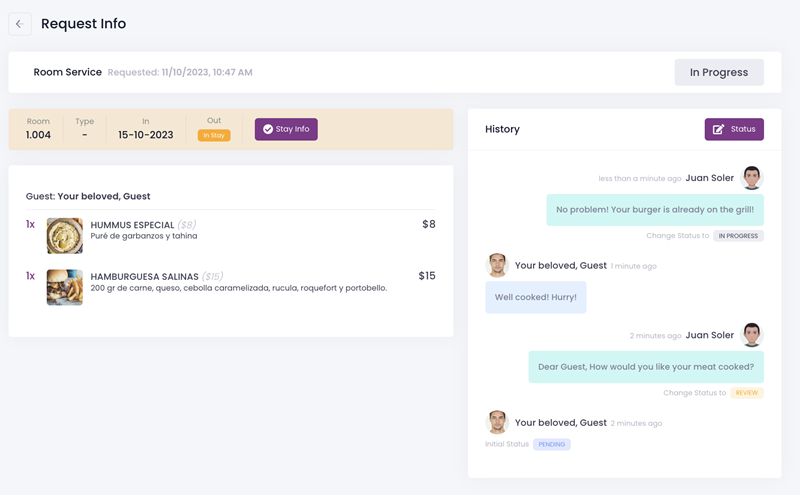
Step into the details of each guest’s request with the Request Info screen.
Here you can see a detailed order summary, including the guest’s name, items requested, and the total cost. Timely information like the request timestamp, room number, and stay details are displayed for quick reference.
On the right, the History panel tracks the progression of the service, logging staff interactions and providing real-time updates to your guests. It’s a complete snapshot, designed to give you full visibility and control over every aspect of guest service management.
Updating a request status is a breeze — just tap the ‘Status’ button and choose the new status. To reply to your guests, leverage our dynamic template messages for a quick and convenient response. They’re fully editable, so you can tailor each message for that personal touch. Find out how to customize these templates in the ‘Settings’ section of this manual.
Guest
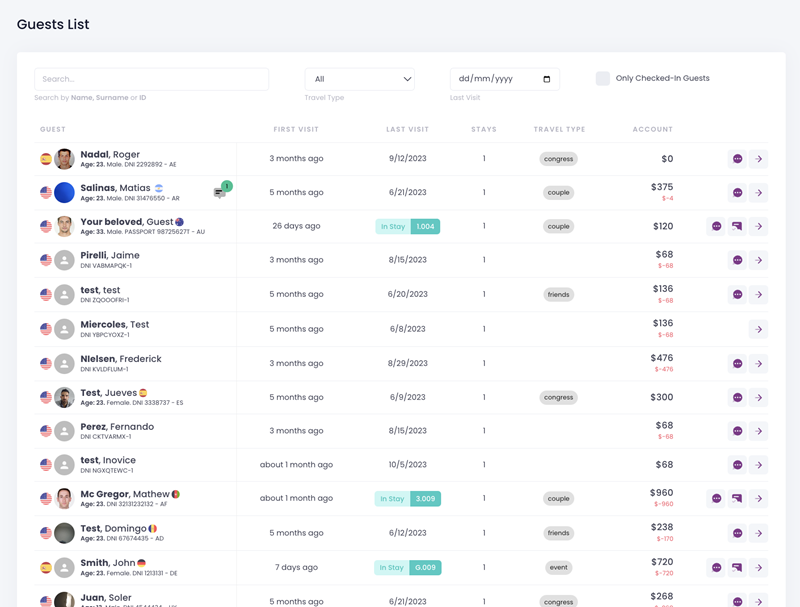
This intuitive interface presents a comprehensive overview of all your guests, giving you quick access to essential details and seamless management capabilities. Here’s what you’ll find and how to use this section:
- Search Functionality: At the top, the search bar allows you to effortlessly locate guests by name, surname, or ID, ensuring that you can quickly find who you’re looking for.
- Filter Options: Streamline your view by using filters to display guests based on criteria such as travel type or date of last visit. For a focused view, toggle the ‘Only Checked-In Guests’ option to see who’s currently staying.
- Guest Details: Each guest entry displays vital information at a glance. You’ll see their name, age, and nationality, accompanied by a flag representing their country. A unique ID is also provided for each guest for easy reference.
- Visit Timeline: Track the guest’s engagement with your hotel, noting their first and last visit dates, total number of stays, and the purpose of travel – be it for leisure or business, event attendance, or other.
- Account Balance: Easily monitor each guest’s current account balance, which reflects charges or credits incurred during their stay. Important. The amount displayed in black represents the grand total of the guest’s account.Any figures shown in red indicate the outstanding balance – this is what the guest still owes. It provides a clear visual cue for accounts that require attention, ensuring no payment is missed.
- Action Buttons: On the right side of each guest´s details, action buttons allow for quick operations like initiating direct communication, accessing the “Stay info” or the guest information screen. Refer to the “Action buttons” section to find out more about this feature!
Action buttons
- Send message to guest: This action allows for immediate direct communication with the selected guest, perfect for confirming details, addressing special requests, or offering personalized touches to their stay.
- Stay info: quick access to one of the most important screens of the system. We will explore this screen right after this.
- Guest info: if you want to dig deeper on this particular guest history you can access this screen and explore all their previous stay with you.
- Room Data Insights: To uncover the history of occupancy for a particular room or delve into specific details about its features, the ‘Room Data’ section is your go-to resource.
Send message
To ensure you are sending the message to the right guest you’ll find the all essential details displayed prominently at the top of the window To compose your message, either type it out manually or select a template by clicking on the “Predefined Messages” button. Once you’re ready, hit “Send Message” — and that’s it! Simple, efficient, and fast communication at your fingertips!
Stay info
This screen is a comprehensive dashboard for managing your guest’s stay. You´ll find all the information you need during a guest stay. Let´s explore it!
Welcome to the Stay Info screen! Designed for simplicity and efficiency is where you´ll find important information a guest’s stay. Let´s explore it!
On the right side of the screen you´ll find:
- Room Essentials: At the very top, you’ll see the assigned room number and type, alongside actionable icons for managing privacy and housekeeping preferences.
- SmartLock Access: Directly beneath the room details, you’ll find the SmartLock section. It displays the current PIN for room access (if generated) alongside the email it was send to. With the additional options on the right side additional actions will pop up. You can generate a new code instantly, manually create a custom PIN or resend the current PIN to your guest.
- Notes and Communication: Something important you want to remember about this guest? Write down any key details or preferences for the guest in the notes section — visible only to hotel staff, these notes are saved for future stays. Be proactive and save as many details as possible! your guests will love it! Next to it, you´ll find another access to the Direct Messages tool that we discussed earlier.
- Guest Information: Here’s where you’ll spot the current occupants of the room. It provides the necessary details, including identification and a visual for quick identification.
- Activity : The Activity Log section records all the service requests and their statuses. You can always click on them to see all the details and interactions for each particular request.
- Reviews: Spot all the guest feedback in one place. Dive into the reviews to see what’s been said and discover how we can up our game for even happier guests next time.
- Messages: Every chat, every note you’ve sent to your guest is right here. It’s like a memory lane of your guest communication – handy for double-checking what you’ve covered.
- Devices: Keep an eye on the gadget count. This tally shows you how techy your guest went with their stay.
On the left side of your screen you´ll find:
- Booking Details: The Room & Extras panel clarifies the booking’s origin, ID code, and the check-in and check-out schedule, all while keeping track of the stay’s duration. You can also access this guest folder in your PMS from here.
- Financial Overview: The Balance section is your quick reference for the guest’s financial status, highlighting charges and payments to their account. We included a handy toggle to show the balance to your guest. The balance is hidden by default but can be displayed to the guest at your discretion.
Guest info
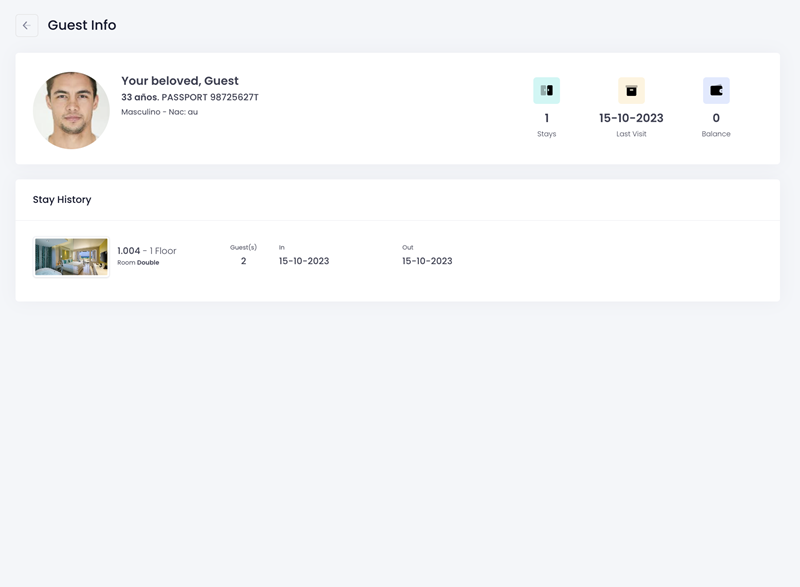
Interested in a comprehensive view of the guest’s history? Find the guest’s past interactions and stays with your establishment exposed in an organized an clear manner. Study his preference an opinions and tailor your service and offering when he comes back!
This section is self-explanatory. At the top, you’ll see the guest’s basic information, followed by a record of all the visits the guest has made to your hotel. Click on it and you will be taken to the Stay info screen of that particular stay.
Rooms
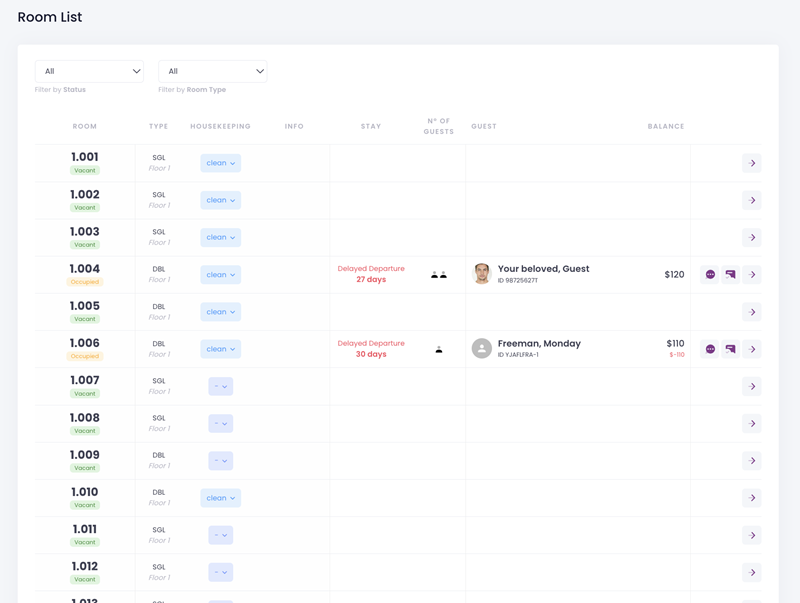
The room module is essentially a centralized dashboard within the VICO platform that provides staff with real-time insights into the status of each room and it´s guests. It’s designed to provide a clear, concise overview that will helps manage housekeeping, front desk activities, and guest services effectively.
Let´s see what information and actions you will find here!
- Operational Filters: As always, you´ll find the filter bar at the top. Sort rooms by various criteria, such as status or room type, allowing for quick navigation and action on specific operational needs.
- Room and Type: First two columns are used to quickly identify rooms and their type.
- Housekeeping: Ensure rooms are prepared promptly for new guests, change the cleaning status, or even request cleaning from the housekeeping column. Simply click on the status and select.
- Info: This section will display guest requests such as ‘Do Not Disturb’ or ‘Do Not Clean,’ ensuring their preferences are respected and communicated to staff.
- Stay & Guest information: Basic but useful information at a glance. Stay duration, number of guests, Complete name and ID. You will also see the balance including the outstanding amount in red.
- Action buttons: Located on the right side of each row, action buttons allow for quick operations like initiating direct communication, accessing the “Stay info” or the room information screen. Refer to the “Action buttons” section to find out more about this feature!
Room data
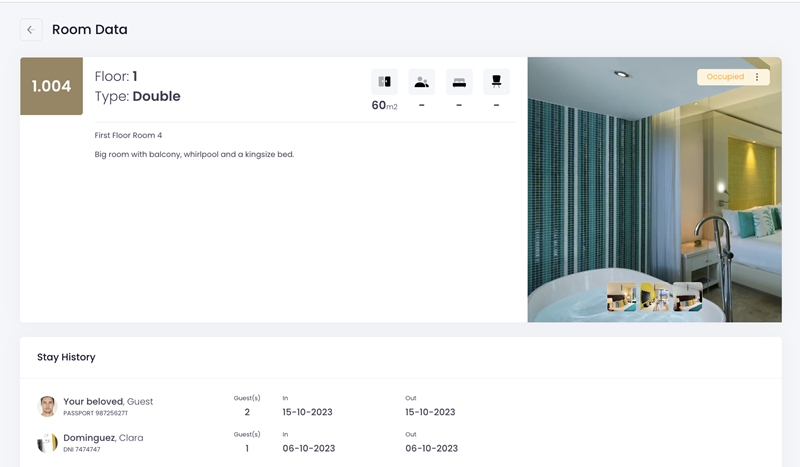
The “Room Data” screen in your ViCo platform serves as a centralized hub for detailed information on individual rooms within your property. Here’s what you can expect:
- Room Identification: At the top, the room number alongside its category is displayed. This gives you a quick reference to the room’s location and type.
- Room Features: You’ll also find a description highlighting the room’s special features, like its size, number of beds, guests, etc. It is your job to make sure the descriptions are precise and up to date. This will help you know your hotel and sell it better!
- Occupancy Status: The top right corner indicates whether the room is currently occupied, vacant, out of service, etc.
- Stay History: The lower section documents past occupancies, listing the names of previous guests, their guest count, and their check-in and check-out dates. As always, you can click on them to enter the Stay info of that particular stay.
Bookable inventory
The Bookable Inventory section provides a comprehensive display of all services and amenities that are available for guest reservations, as configured within the Settings section of your platform. The interface is crafted to allow quick navigation and at-a-glance access to all your offerings details.
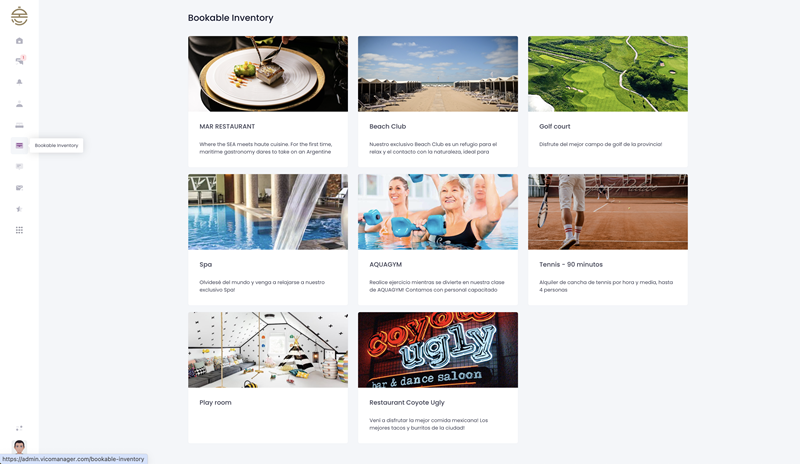
By selecting any item from the overview, you gain access to its detailed reservation calendar. This view is useful for efficient resource management, allowing you to anticipate demand and schedule staffing and stock accordingly.
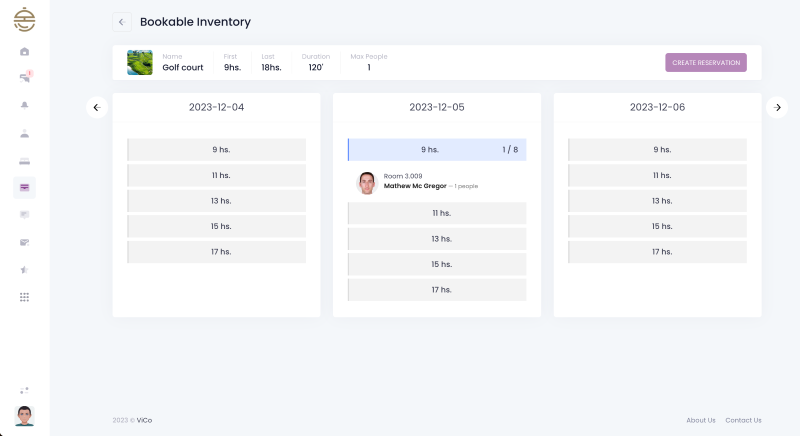
You can see reservation trends, create reservations manually and ensure that every guest experience is flawlessly executed. This section is designed to empower you to stay ahead of operational demands, ensuring that your guests’ experiences are as seamless and enjoyable as possible.
You can create and modify or delete this items and their details from the booking items section in the platform settings!
System settings
You’re now familiar with the basics of ViCo.Now it’s time to dive into personalizing the platform to make it truly yours. Remember, keeping it updated is key to maximizing its potential!
Locating System Settings: It’s super easy – head over to the sidebar menu, take a little scroll downwards, and there it is, just above your profile picture.
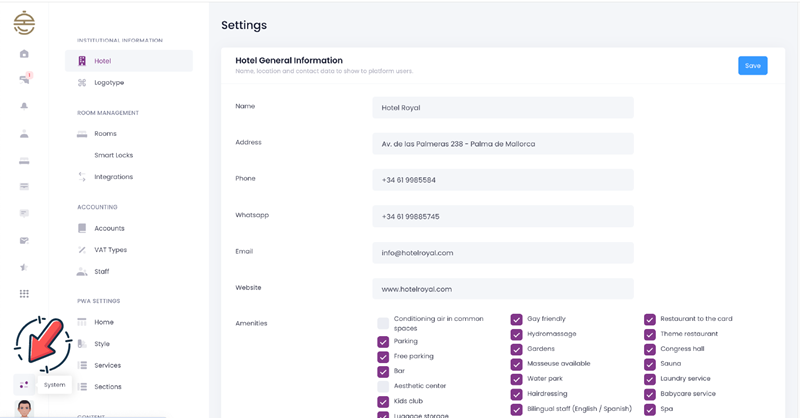
Think of System Settings as your personal toolkit to shape ViCo just the way you like it. It’s intuitive and easy to navigate, let’s take a closer look at what each section offers:
🏨 INSTITUTIONAL INFORMATION
Your hotel’s digital footprint starts here. From its location to the smallest amenity, make sure your hotel’s profile is a mirror image of reality in the PWA.
🔐 ROOM MANAGEMENT
This section is dedicated to managing room specifics and their integrations. It’s a bit more technical, so ensure you understand the settings before making changes.
💼 ACCOUNTING
This is where we sync up with your PMS. It’s the backbone for setting up various items in the content section. Curious about what we’ve imported? Check it out here.
🧑💼 Staff
This is where you find a list of all system users and their roles. Got admin rights? You’ll be able to edit these too. Handy for keeping things running smoothly.
📱 PWA SETTINGS
Your guests’ window into your world. This is where you tailor how and what your guests see regarding your hotel and its offerings. Play around with images, menus, and more to create an inviting digital front for your guests.
Remember, each setting is a step towards perfecting your guests’ experience. So, dive in, explore, and make ViCo truly yours! 🚀🌟
✨ CONTENT: THE HEART OF YOUR VIRTUAL CONCIERGE!
This is where the magic unfolds. Your canvas for creativity. From room details to crafting those perfect message templates, everything content-related lives here. Dive in, experiment, and familiarize yourself with these tools. Make them engaging, your guests will thank you!
Ok! Lets dive deeper in some of the settings so. you can get the most out of ViCo!
Bookable items
From this section you can add, edit or delete whichever service you provide that needs reservations. For quick reference, here is where. you create and manage the bookable inventory that your guest will see.
To add a new service simply click on the Add button at the top right of your screen. Then complete all the general information, make sure you make it clear and atractive!
Finally, click on the settings tab. Here is where you set up the reservation capacity. Your guests will be able to book in slots. A slot is a predefined period during which an activity or service is scheduled to take place.
Lets explain it with an example so its easier. Lets say you have a indoor pool and SPA that can fit 10 people comfortably.
Lets go through each field so you can understand how to complete it.
To understand this
TERMINAR
Message templates
As part of our commitment to streamline your operational efficiency and amplify guest satisfaction, we’ve integrated a powerful Message Templates feature into our platform. Let’s dive in!
Effortless Personalization: With our Dynamic Content system, you can automatically include personalized details such as the guest’s name, reservation details, and even their unique SmartLock PIN. It’s all about making the guest feel recognized and valued from the get-go.
Time-Saving Magic: Crafting individual responses can be a drain on your resources. Our templates allow you to respond swiftly and consistently, ensuring no guest query goes unanswered for long. You’ll have a suite of pre-written responses for common questions and requests that can be dispatched in a click.
Consistency is Key: Standardizing responses doesn’t just save time—it ensures every guest receives the same level of service and information. This uniformity in communication upholds your brand’s voice and leaves little room for error or miscommunication.
Always Engaged: Whether it’s a middle-of-the-night check-in or a special request, your guests will receive immediate and informative responses. This constant line of communication keeps guests engaged and informed, enhancing their overall experience with your establishment.
In short, our Message Templates are more than just a feature; they’re your new best friend in guest relations management. Save time, maintain consistency, and keep the conversation flowing, all while providing an unparalleled guest experience.
Step-by-Step Guide to Using ViCo’s Message Templates
Step 1: Access the Templates
- Navigate to the ‘Message Templates’ section in your ViCo system settings. This is your creative space to craft messages that will resonate with your guests.
Step 2: Craft Your Multilingual Template
- Hit the ‘Create’ button to begin shaping your new template. As you’re guided through the process, you’ll notice the option to switch languages—just click on the flag icon and choose the desired language from the dropdown menu. This feature ensures that your message resonates with guests from around the globe, offering them the warmth of your hospitality in their mother tongue. Whether it’s a welcoming greeting or a departure thank you note, make it universally accessible with our multilingual capabilities.
Step 3: Define the Template Name
- In the ‘Name’ field, enter a descriptive title for your template. Your guests won´t be able to see it, it´s a title for you to remember what the template is about.
Step 4: Personalize Your Message
- Write your message in the designated text box. Remember, this is where your brand’s voice shines. Keep it warm, welcoming, and helpful.
Step 5: Insert Dynamic Content
- Utilize the Dynamic Content options to personalize each message. Click on the placeholders like ‘Name’, ‘Entry Date’, ‘Smartlock PIN’, etc., and place them in your message. These will automatically pull in the relevant guest information when the template is used.
Step 6: Categorize Your Template
- Use the ‘Section’ dropdown to categorize your template (e.g., Check-In, Request, etc.). This keep your templates organized and easily accessible. Only the selected templates would be shown in each section.
Step 7: Save Your Template
- Once you’re happy with the message, hit ‘Save’. Your template is now ready to use and can be sent out to guests with all the personal touches, without the need to type out each message individually.
Step 8: Deploying Templates
- When a guest makes an inquiry, select the appropriate template from your library, review it and edit if necessary and send it out. The system will fill in the dynamic fields automatically with the guest’s specific information.
Step 9: Update As Needed
- Keep your messages fresh and relevant! You can come back to this section anytime to update existing templates or create new ones as your services evolve.
Progessive Wep App (PWA)
Welcome to your digital touchpoint with ViCo’s Progressive Web App (PWA) - literally your hotel in the palm of your guests’ hands.
It’s all about connection: get real-time feels on guest vibes, flash your latest offers, and sprinkle that unique brand magic only you’ve got. So, go ahead, make it personal, make it stylish—your guests are gonna love the extra mile you go for them with your PWA!
Before we dive in, lets take a moment to know what is a PWA and why we choose to use instead of a native app.
Technology has come a long way and nowadays you can have an app on your smartphone that you don’t even need to download from your app store!
How does it work? Easy! You access it through a link or better yet, QR codes posted anywhere and everywhere!
These QR codes will direct guests to the hotel PWA or even to the intended content within the app you want them to see!
For example, you can place QR codes next to the bed so guests will directly access the room service menu or all the hotel amenities!
PWA benefits:
No download required: Guests sometimes are reluctant to download a new apps on their smartphones. Having a PWA increases usage significantly since it reduces the friction of going through the hurdle of installing a new app. Yes! this is a thing nowadays!
Work like a native app: Nowadays PWAs are smooth and full of features, they even work offline. Most people won’t even notice they are not using a native app!
Implementation is faster: Implementing this technology takes days instead of weeks or months depending on the complexity of what’s required!
No storage space required: All the information and functionality are on the cloud so even those guests with cluttered phones will be able to use it!
Lower costs and maintenance: Is the cheaper option. everything is simpler!
Real-time updates: It doesn’t need to be compiled, uploaded to the app store, and then updated by the user. Since it is a web-based technology, changes take effect immediately and can be done by the hotel itself!
Your PWA has four distinct States:
State 1 “General Public”: This the PWA everyone can access and see. They will be able to see hotel general information, your amenities, frequently asked questions, promotions etc. Think of it as your institutional webpage and digital frontdesk! Available sections in the menu bar: Home - Map - Id code.
State 2 “Guests with reservations”: When a new reservation is made in your PMS, we send a welcome email to your guest and a link to this PWA. Its the same as the General Public PWA but with the diference that their reservation is already linked to it so they can do the pre-checkin process. They can also receive push notifications letting them now about the status of their checkin, upsales and more! Available sections in the Menu Bar: Home - Map - Pre-check in form.
State 3 “Instay guest”: Once your guest is checked in, the PWA automatically changes to the Instay state. This will enable guest to make requests, open their room doors with their phones (when available), receive specific notifications, and access their balance.Available sections in the Menu Bar: Home - Requets - Notifications - Balance.
State 4 “Checked out guest”: Once your guest leaves, the PWA will automatically change again. It will be the same as the General State PWA the guest will still be able to see their stay history and chat with you. Available sections in the Menu Bar: Home - Map - Stay History and chat.
Lets explore it!
State 1: General Public
Home
Think of the Home section as your hotel’s virtual lobby—it’s the first impression guests will get. The Home section is where everyone, guest and not guest, lands so it’s prime real estate to highlight what’s special about your hotel. Use this space to captivate and showcase the best you have to offer.
Head over to the ‘Home’ Section in the System settings to tailor this space. Here, you can upload images that represent your hotel’s vibe, rearrange the menu for easy navigation, and opt for icons for a modern touch. Set it up to invite and intrigue every visitor.
Map
A simple but useful map that will guide everyone to your doorsteps!
ID Code
In instances where a guest does not have their personalized link to access your PWA, an alternative method is available. This section outlines the process for guests to use a general link coupled with their reservation code, enabling immediate access to the app’s features.
State 2: Guest with reservation
When guests engage with your hotel’s PWA by either following their personalized link or inputting their unique “ID Code,” they will be redirected to the “Identified check-in” screen, where they would be asked to enable notifications and install the app if they haven´t done so yet. Installing a PWA only means creating a shortcut in your guest home for easy access (they dont have to go to the app store and download the app, accepting the pop up message to install it is enough).
Guests have the option to complete their pre-check-in immediately or do it at a latter time. In the meantime, they can navigate through your PWA at will and get to know your hotel better.
They will consistently be reminded to finalize their Pending Pre-Check-In, with a sign displayed on both the home page and within the Check-In section.
Upon completion of the Pre-Check-In process, guests will be able to view their updated status directly on the home page. Additionally, all relevant messages will be conveniently located in a dedicated section for easy access.
State 3: Instay Guests
When the guest status is changed from “Confirmed” to “Checked in” in your PMS, ViCo will automatically allow guests to access all your services and other features.
Lets take a tour!
Requests
The ‘Requests’ section is a central feature of your Progressive Web App, providing a versatile and interactive platform for your guests.
This section is designed to be highly customizable, allowing your hotel to structure and offer services in a way that best fits your brand and guest needs. From basic amenities to exclusive experiences, you can create and categorize as many service options as necessary, presenting them in an organized and appealing manner.
While we predefined a broad range of possibilities, we understand that not every hotel is the same. Should your hotel require unique functionalities or services, our team is ready to assist in developing and integrating these features into your PWA, ensuring a seamless and personalized guest experience reflective of your hotel’s unique offerings.
Lets see one flow from start to finish:
As you can see this is a simple scenario. You can also review the order if there is a problem with it or even cancel it.
The flow of all requests is similar so you won’t have any problem satisfying all your guest needs! They will be notified every time someone changes their request status!
Notifications
As seen in the video this section provides easy access to all non-requests messages that you sent to your guest. From your general communication messages to your upselling offers, all the messages would be stored here.
What messages would your guest find here? All automatic messages and all direct messages sent to this particular guests.
What messeges won´t be here? All the messages sent when answering a request.
Balance
This section is designed to keep guests informed about the specifics of their stay, including room details, reservation codes, and dates. By default, the visibility of their financial balance is turned off. Of course, this preference can be changed.
Moreover, you have the flexibility to show the balance to a specific guest using the “Show balance” toggle located in the stay info screen.
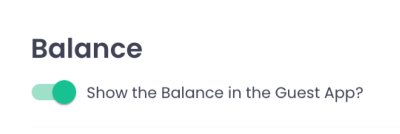
Once activated, this feature provides guests with not just a view of their current balance, but also access to a comprehensive ledger detailing all charges and payments, presented with utmost clarity. Following check-out, this is where guests will find the invoice to download.
Lets watch it in action:
The ‘Check Out’ button will remain inactive and will only become available when the following criteria are fulfilled:
- The guest’s balance has been fully settled.
- The scheduled check-out date has arrived.”
Once this criteria is met your guest will be able to “Auto Check-out” and their invoice will be automatically created (by the PMS if available). Lets see it! º
State 4: Checked-out Guests
When a guest checks out from your Property Management System (PMS), your Progressive Web App (PWA) seamlessly transitions yet again! Now, it mirrors the “State 1: General Public” layout, but with a crucial twist: the guest retains full access to their entire stay details. They can download their invoice and even continue to communicate with you through the chat feature. This ensures a smooth and connected post-stay experience, keeping the lines of communication open even after their departure.
Lets see it:
Congratulations on completing this tutorial!
We hope you found the information provided helpful. If you have more questions or need further clarification, feel free to check out our Frequently Asked Questions (FAQ) section for answers to common queries.
FAQs
We appreciate your time and dedication to learning with us. See you in future tutorials, and we hope you have an amazing experience applying what you’ve learned!
Until next time!